
Sunday, January 29, 2012
Meal planing
I am horrible at meal planing. The weeks I do plan, we NEVER and I mean NEVER stay on them. Something always comes up, work wise or my family just isn' "feeling" the particular meal that day. It really is a challenge. The last thing I want to deal with at 5:15/5:30 when I get home is trying to figure out what to make for dinner. My amazing husband has been doing much of the cooking the last few months. I am very grateful to him for that, and I have been trying to get back on the wagon. I am so exhausted when I get home from work, and on the days I'm home from chasing after my rambunctious toddler. I desperately need QUICK and EASY dinners that don't come out of a box. Every recipe I have found, isn't as quick and easy as it claims, nor is it something that my husband is fond of. It is something I have struggled with during our marriage. He would rather just eat ramen, hamburger helper, and mac and cheese. Our family needs more recipes, that are simple and easy. Any suggestions? What are your favorite family meals?
Saturday, January 28, 2012
Homemaking Fail
I made cookies the other day, chocolate chip cookies that is. And they turned out badly. I have NO clue what I did wrong. I have made this recipe before (and since) and they turned out perfect. Just goes to show that we all have off days, and this was one of mine.


Cheers!
Ashley
Thursday, January 26, 2012
Take 5 Thursday #3
Take 5 Thursday #3
I made a trip to Ikea recently to try and find a few decorative touches to place around my home. I love Ikea, it has amazing items for your home that are cheap. While I will never achieve the perfection they have in their store, I love wandering and getting ideas for things I can place in my own home. This was one of them.I purchased a plate, rocks and a circular candle, and turned it into a fun piece.
Before:

After:

A quick and easy thing to add to your home. You can do this type of thing with any of your own objects that you may already have around your home. Perhaps you have some seashells, an old platter and a candle to do something similar with? The options are endless.
Wednesday, January 25, 2012
Cleaning a glass top stove
I will admit it. I am a gas stove top girl. I was very hesitant when we first moved into this place because it had a glass top stove. Our property manager gave us some special cleaning solution for it, but to be honest, it never worked really well. I hated it. Honestly it was HORRIBLE, it took me over an hour of scrubbing to get the thing clean with the smallest of spills. I gave up. Let me tell you, giving up on our stove top leads to it looking like this... (please no judgment)

I honestly couldn't take it anymore. I asked a friend what I could do other than scrubing and killing my arms and using gross smelling chemical products. Let me tell you, she is AMAZING when it comes to green cleaning. I am a sceptic, and I admit, I would rather use a strong chemical cleaner and do less scrubbing than use a weak green one and end up scrubbing a ton. However, she assured me that this strategy would involve less scrubbing time, and I though it was worth a shot. I took a bowl of hot water and regular dish soap and soaked a towel big enough to cover my stovetop. (I apologize for the bad pictures, my camera did something funky and I have no clue what happened!)

Allow the cloth to soak for a few minutes and cover the stove top with baking soda, then wring out the towel so that it is damp, but not soaked, and lay it over the entire stove top.

Then comes the best part, set the timer for 15 minutes, and walk away. Thats right, put your feet up, (or deal with the pile of dishes you have been ignoring) and let the baking soda do its magic.

When the timer goes off, use the towel to wipe (maybe a little scrubbing) and shine your stove top.

I had baking soda in the crevasses when I was done, so I just used a q-tip to clean it up really quick.

And VOILA! Your stove top looks shiny, and AMAZING.

Just look at this! Isn't it so pretty!!!


I promise this took less work than any commercial cleaner I have used, and had much better results! Hope that this will help you all in your home cleaning!
Cheers!
Ashley
PS I love to PARTY! Blog link party that is, check out where I party by clicking here and join the fun. Also, if you know of another great party, please share it with me so I can join the fun there too!
Tuesday, January 24, 2012
Mickey Mouse Birthday
For my son's 1st birthday, we chose a Mickey Mouse theme for his birthday party. Honestly I had TONS of super cute ideas, but I ran out of time at the last minute. I did manage to make some things happen and it was nice to have family and a few friends celebrate with us.
Here is the table. On it is Max's 1st mickey hat, a picture from each month he has been with us, as well as other miscellaneous small Mickey favors, and the food. It was all on a Mickey table cloth that we picked up at Toy's R Us.

As you can see I used 2 mini and one regular Oreo to top some of the cupcakes with Mickey ears. I also purchased some Mickey candy toppers, and found a fun #1 candle at the dollar store that fit the theme.

I also used a Mickey cookie cutter to shape some rice krispy treats. They were a big hit! I also had veggies, just so that there were some healthy options.


Cheers!
Ashley
PS I love to PARTY! Blog link party that is, check out where I party by clicking here and join the fun. Also, if you know of another great party, please share it with me so I can join the fun there too!
Sunday, January 22, 2012
Crock Pot Potato Soup
This is my new favorite slow cooker recipe. It is so yummy and on top of that, it makes a TON of potato soup and it freezes perfectly!
You need a big crock pot for this one, here is mine:


And put them in the croc pot

Then dice a yellow onion, and add 10 cloves of garlic


Here is the full recipe for you to enjoy!
Baked Potato Soup (crock pot)
Ingredients:
- 5lbs Russet Potatoes, washed but
NOT peeled. Diced into 1/2 inch(ish) cubes
- 1 large yellow onion, diced
- 10 cloves of garlic whole
- 8 cups chicken stock
- 16 oz cream cheese
- 1 TBS salt
Garnishes:
- Crumbled bacon
- Shredded cheddar cheese
- Green onions
Directions:
Add potatoes, onion, garlic,
seasoning and chicken stock to slow cooker. Cook on high for 6 hours. Remove and puree the garlic
cloves along with 1/2 to 1/3rd of the soup, and then
reintroduce to the remainder in the crock pot. Stir in the cream cheese and
allow to melt. Stir until soup is well blended, you may have to wait 5-10 min in between stirring to allow the cream cheese to fully melt. Top with your choice of garnishes
& enjoy!
Cheers!
Ashley
PS I love to PARTY! Blog link party that is, check out where I party by clicking here and join the fun. Also, if you know of another great party, please share it with me so I can join the fun there too!
Friday, January 20, 2012
Chicken Tortilla Bake
I noticed that many of you have found me from Pintrest! Welcome, I am so excited to have you, please enjoy this recipe. I would love to hear from you and share more yummy things and homemaking advice and mishaps of mine, so please bookmark or follow my blog. If you enjoy this recipe, try this chicken casserole or my NEW Black Bean Tortilla Bake (a vegetarian/meatless version of this recipe)
This is one of my favorite easy recipes. It is really simple and very filling. In our family, I serve it with sour cream, guacamole and tortilla chips. I will admit usually I don't include a vegetable, but this dish is seriously so filling, that this seemingly small dish really does make multiple servings (6-8) and it only takes 5 ingredients. Here is what you will need:

2 10 3/4oz cans of cream of chicken
1 10oz can of dice tomatoes and green chilies
12 6in corn tortillas
3 cups of cooked chicken
1 cup shredded Mexican cheese blend
I had gotten some chicken on sale and just cut it up and threw it into the frying pan to cook it quick.

It may not be the healthiest way to cook chicken, but its fast and easy.

Then you combine the 3 cans and mix them up

Then you chop up the tortillas into bite sized pieces.


Layer 1/3 of the tortillas onto the bottom of a 3 quart pan

Place half of the chicken on top of the tortillas

Then spoon 1/2 the soup mixture on top of the chicken

Repeat layers and top with the rest of the tortilla strips.

Cover and bake at 350 for 40 minutes

Top with cheese and bake an additional 5 minutes until the cheese melts, then it looks like this...

Chicken Tortilla Bake
Ingredients
2 10 3/4oz cans of cream of chicken
Preheat oven to 350 degrees
Combine the 3 cans and mix them up, then set aside
Chop up the tortillas into bite sized pieces.
Layer 1/3 of the tortillas onto the bottom of a 3 quart pan
Place half of the chicken on top of the tortillas
Then spoon 1/2 the soup mixture on top of the chicken
Repeat layers and top with the rest of the tortilla strips.
Cover and bake for 40 minutes
Top with cheese and bake an additional 5 minutes until the cheese melts
ENJOY!
Thursday, January 19, 2012
Take 5 Thursday #2
Take 5 Thursday's are all about quick things you can do to change your home for the better in 5 minutes or less.
When I was in college and moved into my 1st one bedroom apartment with two other gals, I had to make some purchases which at that point I figured would be fun for the girls. Those who know me, know that I have a weakness for hot pink. So, when shopping at target to pick up some of those simple essentials I spotted a very fun bright pink trashcan. This trashcan followed me through 3 apartments of girls, and into my first two apartments with my hubby. One day it hit me, we should not have a hot pink trashcan, as it in no way matches our kitchen decor, or any decor in our home really. Also, with a curious baby around, it is only a matter of time before he creates some disaster with it. We needed a grown-up trashcan, one with a lid.


See? Such a simple change and it made such a huge difference. We really are grown-ups, I promise, we only used the hot pink one for two years. I am so glad that we now have a nice looking place to conceal our trash. Such a quick and easy thing to do.
Take 5 #2
When I was in college and moved into my 1st one bedroom apartment with two other gals, I had to make some purchases which at that point I figured would be fun for the girls. Those who know me, know that I have a weakness for hot pink. So, when shopping at target to pick up some of those simple essentials I spotted a very fun bright pink trashcan. This trashcan followed me through 3 apartments of girls, and into my first two apartments with my hubby. One day it hit me, we should not have a hot pink trashcan, as it in no way matches our kitchen decor, or any decor in our home really. Also, with a curious baby around, it is only a matter of time before he creates some disaster with it. We needed a grown-up trashcan, one with a lid.
Before:

After:

See? Such a simple change and it made such a huge difference. We really are grown-ups, I promise, we only used the hot pink one for two years. I am so glad that we now have a nice looking place to conceal our trash. Such a quick and easy thing to do.
Thursday, January 12, 2012
Take 5 Thursday #1
This is a new series feature each Thursday to help me kick start bloging again on a semi-regular basis. Thanks for sticking around! Take five is something you can do in 5 minutes to help make your home a better, more relaxed place. This could be anything from adding a decoration to a quick cleaning touch up.

Enter two pillow cases from Ikea that were very cheap, and put the sad pillows into the happy red pillow cases.

And the couch becomes a happy comfy couch, in just a short 5 minutes.

New pillows or covers for your old pillows can completely change the feel of a room, and make it fresh with just a few minutes of your time.
Take 5 #1
Throw pillows can make a blah couch much better. This is the hand-me-down couch we got from my grandma. It is a sleeper, (which is awesome for company) as well as looks 1,000,000 times better than our old couch, which I swear was from the 70's and we got for free from another couple who had gotten it for free from someone else. Anyways, this couch is a vast improvement! The pillows left something to be desired however.
Enter two pillow cases from Ikea that were very cheap, and put the sad pillows into the happy red pillow cases.

And the couch becomes a happy comfy couch, in just a short 5 minutes.

New pillows or covers for your old pillows can completely change the feel of a room, and make it fresh with just a few minutes of your time.
 I am a follower of Jesus Christ, I am married to the most wonderful guy, Matt. I am a new mommy to the sweetest boy in the world! I like to live my life as God blesses me each and every day, and it is my job to find out how and where and be thankful. What a wonderful and faithful God I serve.
Tuesday, January 10, 2012
Cloth Diapers
I can not tell you how amazing this journey of cloth diapering has been for me. I am so thankful that someone showed me cloth diapers are not difficult, and that they can save you thousands of dollars during a child's life. I would like to share our diapers with you, so that perhaps you to, can share the joy of cloth diapering. Please know I am sharing 100% of my own experience and am not being paid or asked to endorse these products.
First things first, we use one brand but two different styles of diapers. The one that we use every day only have two differences to disposable diapers. 1- they use snaps instead of sticky tape and 2- you wash them instead of throwing them away. Plus they are WAY cute, I mean just look at this little guy in his diaper

Here is a breakdown and link to these amazing diapers, I honestly can not say enough good things about these diapers or this company.

We spent $500 total on all
of my diapering needs for my son, and that is all the diapers I need. In
addition, I will be able to use all of these diapers from birth - 35ish pounds
AND on baby #2 coming at the end of May. I will do a separate post
tomorrow about my washing routine, but please feel free to ask questions.
Using cloth has saved our family so much money and it continues to do so,
it really is worth the little extra effort it takes.
First things first, we use one brand but two different styles of diapers. The one that we use every day only have two differences to disposable diapers. 1- they use snaps instead of sticky tape and 2- you wash them instead of throwing them away. Plus they are WAY cute, I mean just look at this little guy in his diaper

Here is a breakdown and link to these amazing diapers, I honestly can not say enough good things about these diapers or this company.

We also purchased another style for overnights and
to use in addition that allowed us to add more absorbency if needed. They
are the Bum genius 4.0's, there is an extra step with
these diapers, where you stuff liners into the pockets, but other than that,
they are very similar to the other's we use.
Friday, January 6, 2012
Money, Money, Money.

We all know that money doesn't grow on trees. Learning how to be wise about your money and making it work for you is one important aspect of running your home. At the beginning of each year my husband and I sit down and figure out our budget. This year was a particular challenge. Unlike most jobs my husbands is very up and down. He goes in for work every morning (M-F) at 8am and he could be done at 10am or 4pm or any time in-between. Sometimes, he will get called off the night before or even the morning of. He works for a small company that was struggling, but are doing better now. He is one of 4 employees, 2 if you don't count the owners. He loves his work and I love that he has sometimes, he gets called off on my day off, and we get a bonus day together. I don't like the fact that we have NO CLUE from week to week what his paycheck will look like. It makes for some creative financing.
We live by a few simple rules in our home to help keep our bank account as stable and level as possible. Perhaps some of these rules will help you and your family with your finances.
1. We purchase everything on our credit card. This may seem counter intuitive as most people will tell you to not use your credit cards. However, we ALWAYS pay it off every month, notice the it. We have one credit card that we use. It is a rewards card. We have been using this card for the 2.5 years of our marriage, never paid a cent in interest, fees or fines. We have however received $400 in gift cards or cash in that amount of time. These are just our normal monthly purchases. Things like our phone bill, car insurance, groceries, baby supplies. We honestly don't spend that much per month, but it has been so great to be able to put a little in savings or get a gift card to a nice restaurant for a special date. I would recommend this strategy for anyone, who can control their spending. If you are someone who gets that plastic card in their hands and uses it to buy/splurge on anything you want, this will not work for you. However, if you can pay it off every month, why not make money off your credit card?
2. Stay out of debt. Currently, the only debt we have is my hubby's student loans. We currently rent (hopefully we will be adding a mortgage to our debt in the near future, that will be cheaper monthly than our rent), we drive cars that are completely paid off, and the biggest thing, we live with in our means. This is so hard for me, especially at Christmas time. Our first year of marriage, we had practically no Christmas decorations. I actually broke down, with full on tears in Target because we didn't have the money to buy very many decorations. I wanted Christmas to be magical, but we stuck to our guns. Would an extra $50 that we couldn't pay off on the credit card been the end of the world? No, but we have chosen that credit card debt is not a path we want to go down. One way I make this easy on my self, is I pay a little towards our credit card each week, so I don't have one huge bill at the end of the month.
3. Save, Save and Save. It may not seem like a lot but $30 here or $50 there can add up to a lot over time. When I was in college, my bank started a "keep the change" savings plan. Whenever you use your debt card, they would round the purchase up to the next dollar and transfer the difference into your savings account. We still do use our debt card on occasion, as there are vendors who do no accept credit cards. But over the last 6 years, I have saved over $850 just because of this program. Savings I don't have to think about. It truly shows that a penny saved is a penny earned.
4. Splurge on occasion, but with in your means. We budget $100 for incidentals each month we use this money for random things we need that aren't already in our budget. An example that happened last month was we needed a new laundry basket, another example would be us seeing the hubby's family out of town and using it to cover the extra gas. Typically we have a little left over from this and we use it to go on an extra date, get ice cream, buy a movie or two that we have been wanting. Allowing ourselves to splurge here and there helps us stick to our strict and tight budget with out feeling like we always have to go without.
5. Budget. It isn't fun, but it makes life easier. If you know that you have x amount per month to spend on gas or groceries, and you stay with in that number you know that you are always spending within your means. Each month we have fixed bills (rent, phone bill, internet etc) and then the ones that change from month to month (utilities, gas and food). With the flexible bills we always try and find ways to spend UNDER our budget that way we have extra money to save or splurge. We conserve electricity, we drive as little as possible we shop sales etc. There are tons of ways to make it work so that you can have a little bit of extra each month.
I hope that maybe something in here helps you. We try hard as a family to keep our finances under control and to always live below or within our means each month. Please let me know if you have any questions.
Thursday, January 5, 2012
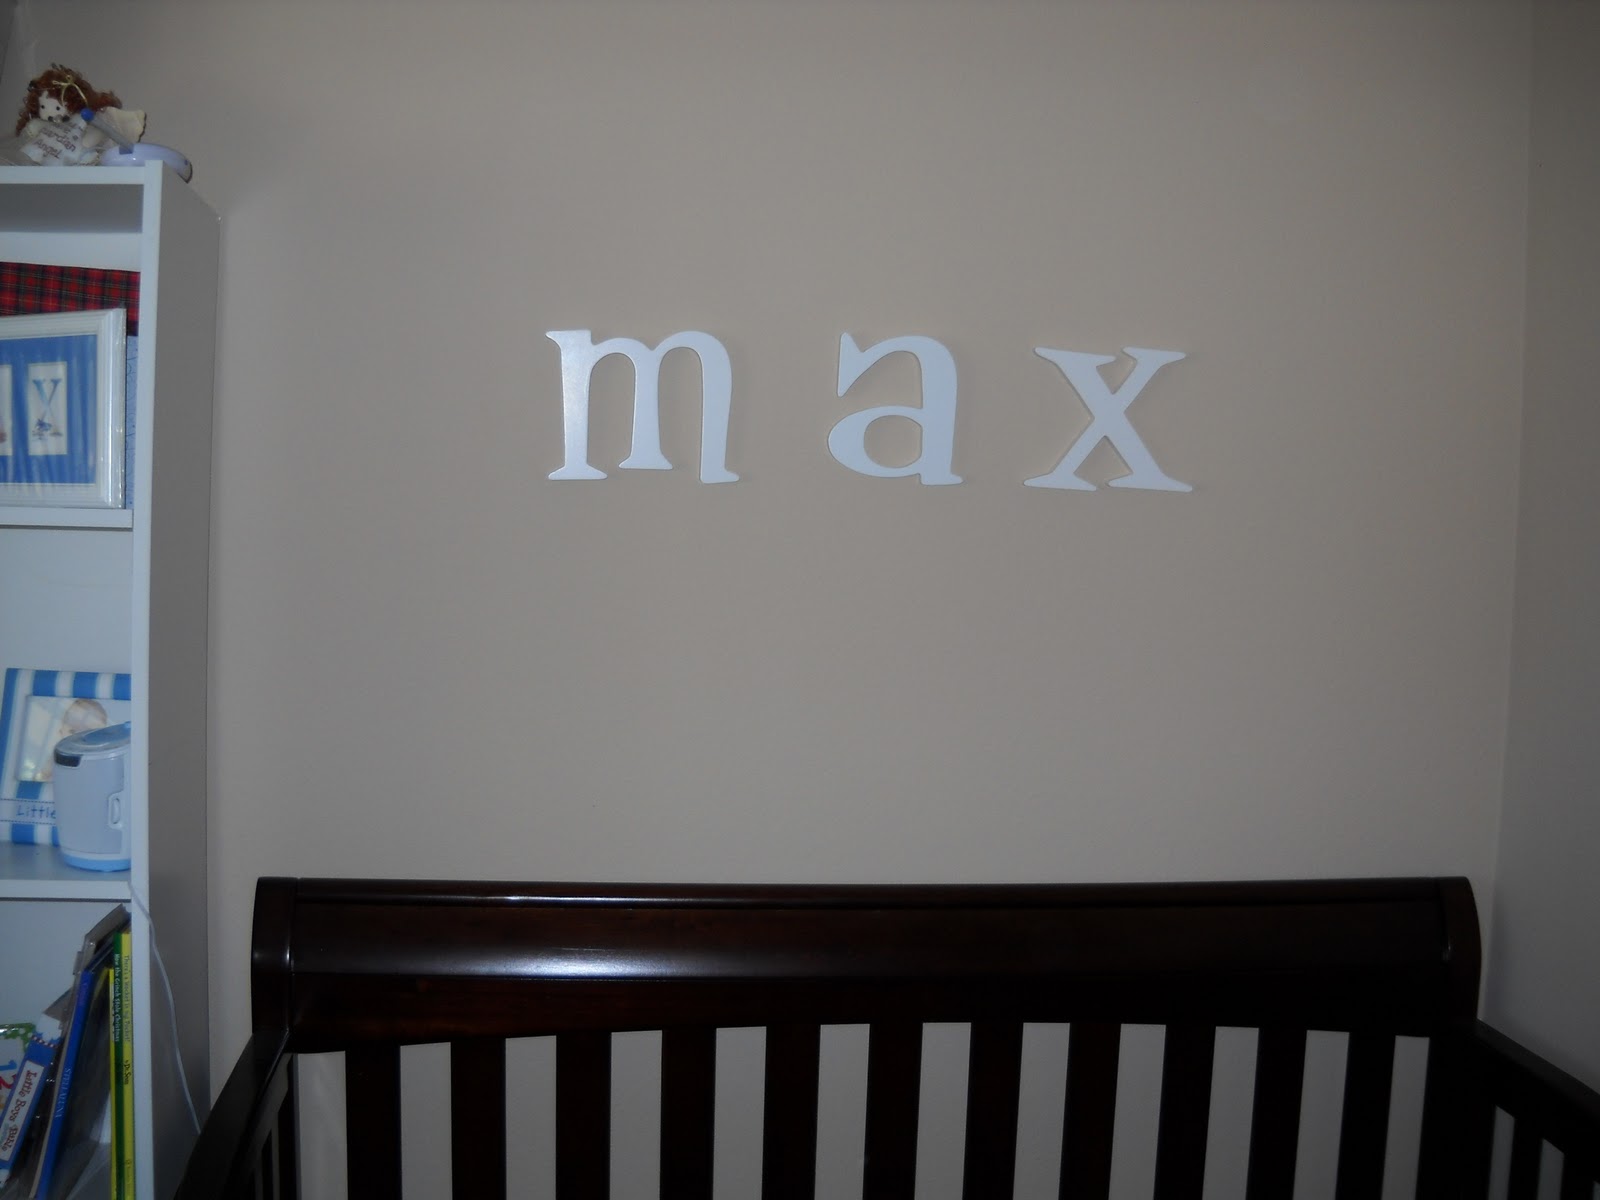
Max's room 1
When my sweet baby boy was born, we were living in a one bedroom apartment. We had actually signed a new lease the weekend before we found out we were expecting. We knew that we were stuck with that one bedroom, so we never really did a nursery. I never got to set one up really. We just crammed the furniture we needed for him into our room, and made it work. I was so thankful to be able to decorate his room, and add some fun touches for him. One of the things I really wanted to do, was to add his name above his crib. I found these letters on clearance at Target for only $6.50 each.

They came with the option of hanging them with ribbon or flat on the wall, I chose to just mount them strait on to the wall without the ribbon, and to place them above the crib. Here is what the crib looks like before.

I choose to enlist my husband to do the hammering, because he is just better than me at that stuff and I some how, ALWAYS hit my finger. However the down side, is that my hubby insists on "eyeballing" everything. *sigh granted he always does a great job, but when putting holes in the wall, call me crazy but I would prefer to pre-measure, and use a level.

This is the end product, nothing elaborate, or fancy but it does make a personalized room for him and it makes me smile.
His room is still a work in progress, and we will have to be transitioning it to a room for two in the near future, but such is life.
Subscribe to:
Posts (Atom)